Support

How to backup your iOS Devices
Backup Your iOS Devices
There are many ways to backing up Mac devices, including the built-in Time Machine app (in OS X). Online Cloud services are important for backing up, especially for a redundant backup strategy. Bootable backups are a way to get your Mac running again in case of a primary drive failure. As for the iOS devices, however, we have three different options.
iCloud Backup
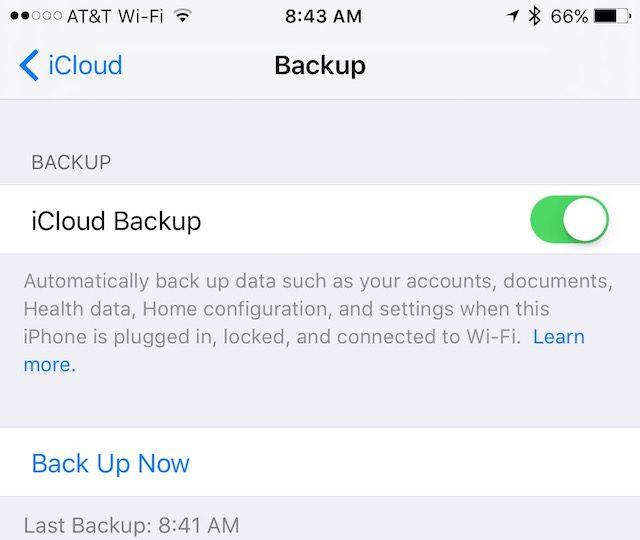
One of the easiest and most popular ways to back up an iOS device is to use the function that is already built in, the iCloud. Enable the iCloud backup by going to Settings > iCloud > Backup. iOS devices include iPhones, iPod touches, and iPads – they are backed up when you are logged into iCloud as shown above, at the Lock Screen and not being used, and connected to Wi-Fi. So every time you plug your phone in to charge, whether it be while you’re sleeping or just while you’re not using it, it gets backed up.

The main things that iCloud backs up are account information, documents created on an iOS device, Health information, Home settings, and regular settings. So if you need to reset your phone for any reason, it is incredibly simple to get right back to where you were. It is also useful when it comes to getting a new phone or device. During the setup process for iOS devices, it will ask if the user wants to set up a new device or restore using a backup. You can then select a saved backup from the iCloud, so that settings and data are restored and apps will begin downloading to the home screen.
You must have an iCloud account however. Apple provides 5 GB of free space, so if you have one or two devices, this may work for you. For greater than 5 GB, however, you will need to pay – 50 GB for $.99 a month, 200 GB for $2.99 a month, and 1 TB for $9.99 a month.
iTunes Backup
iTunes can also be used to back up iOS on any Mac or any PC. All you need is a Lightning cable or 30-pin Dock Connector Cable. Which cable you need depends on the model of the iOS device you’re planning to back up.
When it comes to backing up Health or Activity data, or an Apple Watch, you need to first encrypt the data.
iOS Flash Drive
There are iOS flash drives are available from a multitude of manufacturers, with the most recommended being Leef iBridge, which can be found at macfixit.com.au. This particular iOS flash drive is available in 16GB, 32 GB or 64 GB. It works as a free companion iOS app, displaying when it is available to back up onto the iBridge. It uses a fast, one-tap way to move files from the device to the iBridge. Once it is stored on the drive, it can then be used to transfer onto the computer, or even another iOS device.
Our devices go everywhere with us, carrying a lot of personal information, media, and data. These backups are easy to do, and should not be neglected as they’re incredibly important for restoring, resetting, or transferring data to a new device. Make sure that you include your iOS devices in your overall backup plan.
There are many ways to backing up Mac devices, including the built-in Time Machine app (in OS X). Online Cloud services are important for backing up, especially for a redundant backup strategy. Bootable backups are a way to get your Mac running again in case of a primary drive failure. As for the iOS devices, however, we have three different options.
iCloud Backup
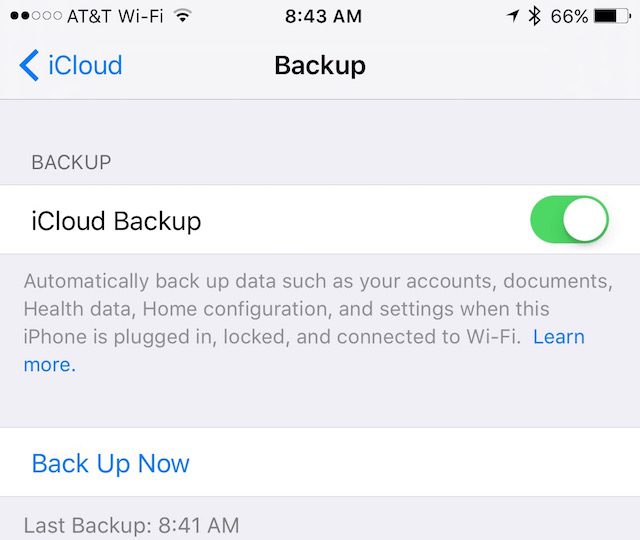
One of the easiest and most popular ways to back up an iOS device is to use the function that is already built in, the iCloud. Enable the iCloud backup by going to Settings > iCloud > Backup. iOS devices include iPhones, iPod touches, and iPads – they are backed up when you are logged into iCloud as shown above, at the Lock Screen and not being used, and connected to Wi-Fi. So every time you plug your phone in to charge, whether it be while you’re sleeping or just while you’re not using it, it gets backed up.

The main things that iCloud backs up are account information, documents created on an iOS device, Health information, Home settings, and regular settings. So if you need to reset your phone for any reason, it is incredibly simple to get right back to where you were. It is also useful when it comes to getting a new phone or device. During the setup process for iOS devices, it will ask if the user wants to set up a new device or restore using a backup. You can then select a saved backup from the iCloud, so that settings and data are restored and apps will begin downloading to the home screen.
You must have an iCloud account however. Apple provides 5 GB of free space, so if you have one or two devices, this may work for you. For greater than 5 GB, however, you will need to pay – 50 GB for $.99 a month, 200 GB for $2.99 a month, and 1 TB for $9.99 a month.
iTunes Backup
iTunes can also be used to back up iOS on any Mac or any PC. All you need is a Lightning cable or 30-pin Dock Connector Cable. Which cable you need depends on the model of the iOS device you’re planning to back up.
- Plug the cable into the USB port of your Mac or PC, then launch iTunes. Connect the device using the cable. Any content that you purchase from iTunes or App Store will then be transferred to your Mac or PC.
- Go to File > Devices, and then Transfer Purchases, all on the menu bar. If the File menu is not available, hold down the Control and B keys at the same time, allowing it to pop up. Let the content finish transferring before you unplug your device.
When it comes to backing up Health or Activity data, or an Apple Watch, you need to first encrypt the data.
- Go to the phone menu on iTunes, then select "This Computer", and check the "Encrypt Data" box. You may have to make a password – make sure it’s one that you’ll remember, because you’ll need it to access the backup. If you don’t have to back up Health or Activity, you can ignore encrypting the data.
- Click “Back Up Now” and the back up will begin.
iOS Flash Drive
There are iOS flash drives are available from a multitude of manufacturers, with the most recommended being Leef iBridge, which can be found at macfixit.com.au. This particular iOS flash drive is available in 16GB, 32 GB or 64 GB. It works as a free companion iOS app, displaying when it is available to back up onto the iBridge. It uses a fast, one-tap way to move files from the device to the iBridge. Once it is stored on the drive, it can then be used to transfer onto the computer, or even another iOS device.
Our devices go everywhere with us, carrying a lot of personal information, media, and data. These backups are easy to do, and should not be neglected as they’re incredibly important for restoring, resetting, or transferring data to a new device. Make sure that you include your iOS devices in your overall backup plan.
